Block Development Walkthrough
What to expect from this guide
The guide will create an overview of the main components of a typical downstream block, and will provide examples for each of the steps, from configuring the development environment, to running the software analysis tool within Platforma back-end and showing the results in the UI.
Examples from a real block, ImmunoMatch, will be used.
The examples might differ from the original repository to allow focusing on the various concepts or simply because of the natural evolution of the original repository. To experiment with the code it is recommended to sync the ImmunoMatch project.
Overview
A block wraps a biotech software analysis tool.
In general it will:
- Use information produced by upstream blocks.
- Arrange it in a convenient way, so that the software analysis tool can use it as input. Usually as one or more csv/tsv files.
- Process the software tool outputs, usually some other csv/tsv files and optionally make them available to other blocks.
- Display the results in tables, graphs or other UI elements.
For the ImmunoMatch block it:
- Presents the user with the option to choose Heavy chains data produced by an upstream block, like MiXCR Clonotyping 2.
- Discovers the associated Light chains and and Light chain types.
- Prepares this data as a csv file which is then fed into the ImmunoMatch software analysis tool.
- Displays the results as a histogram in the Platforma application.
In the following sections we will break down each of the steps listed above.
Data flow
Throughout the guide we will be referring to the terms backend and client:
- Backend refers to the server part of Platforma. It is where the software analysis tool will run and where the data is stored.
- Client or Platforma UI refers to the Platforma Desktop application. This usually runs on your computer or laptop.
Using information produced by upstream blocks
Upstream blocks can choose to export the software analysis tool run results to be used by other downstream blocks. The place where these results can be found at is called the "Result Pool". For example, the MiXCR Clonotyping block will export the Heavy chains, Light Chains and many other analysis results there. ImmunoMatch will export the Heavy chain / Light chain pairing results, and so on.
Result Pool data: PColumns
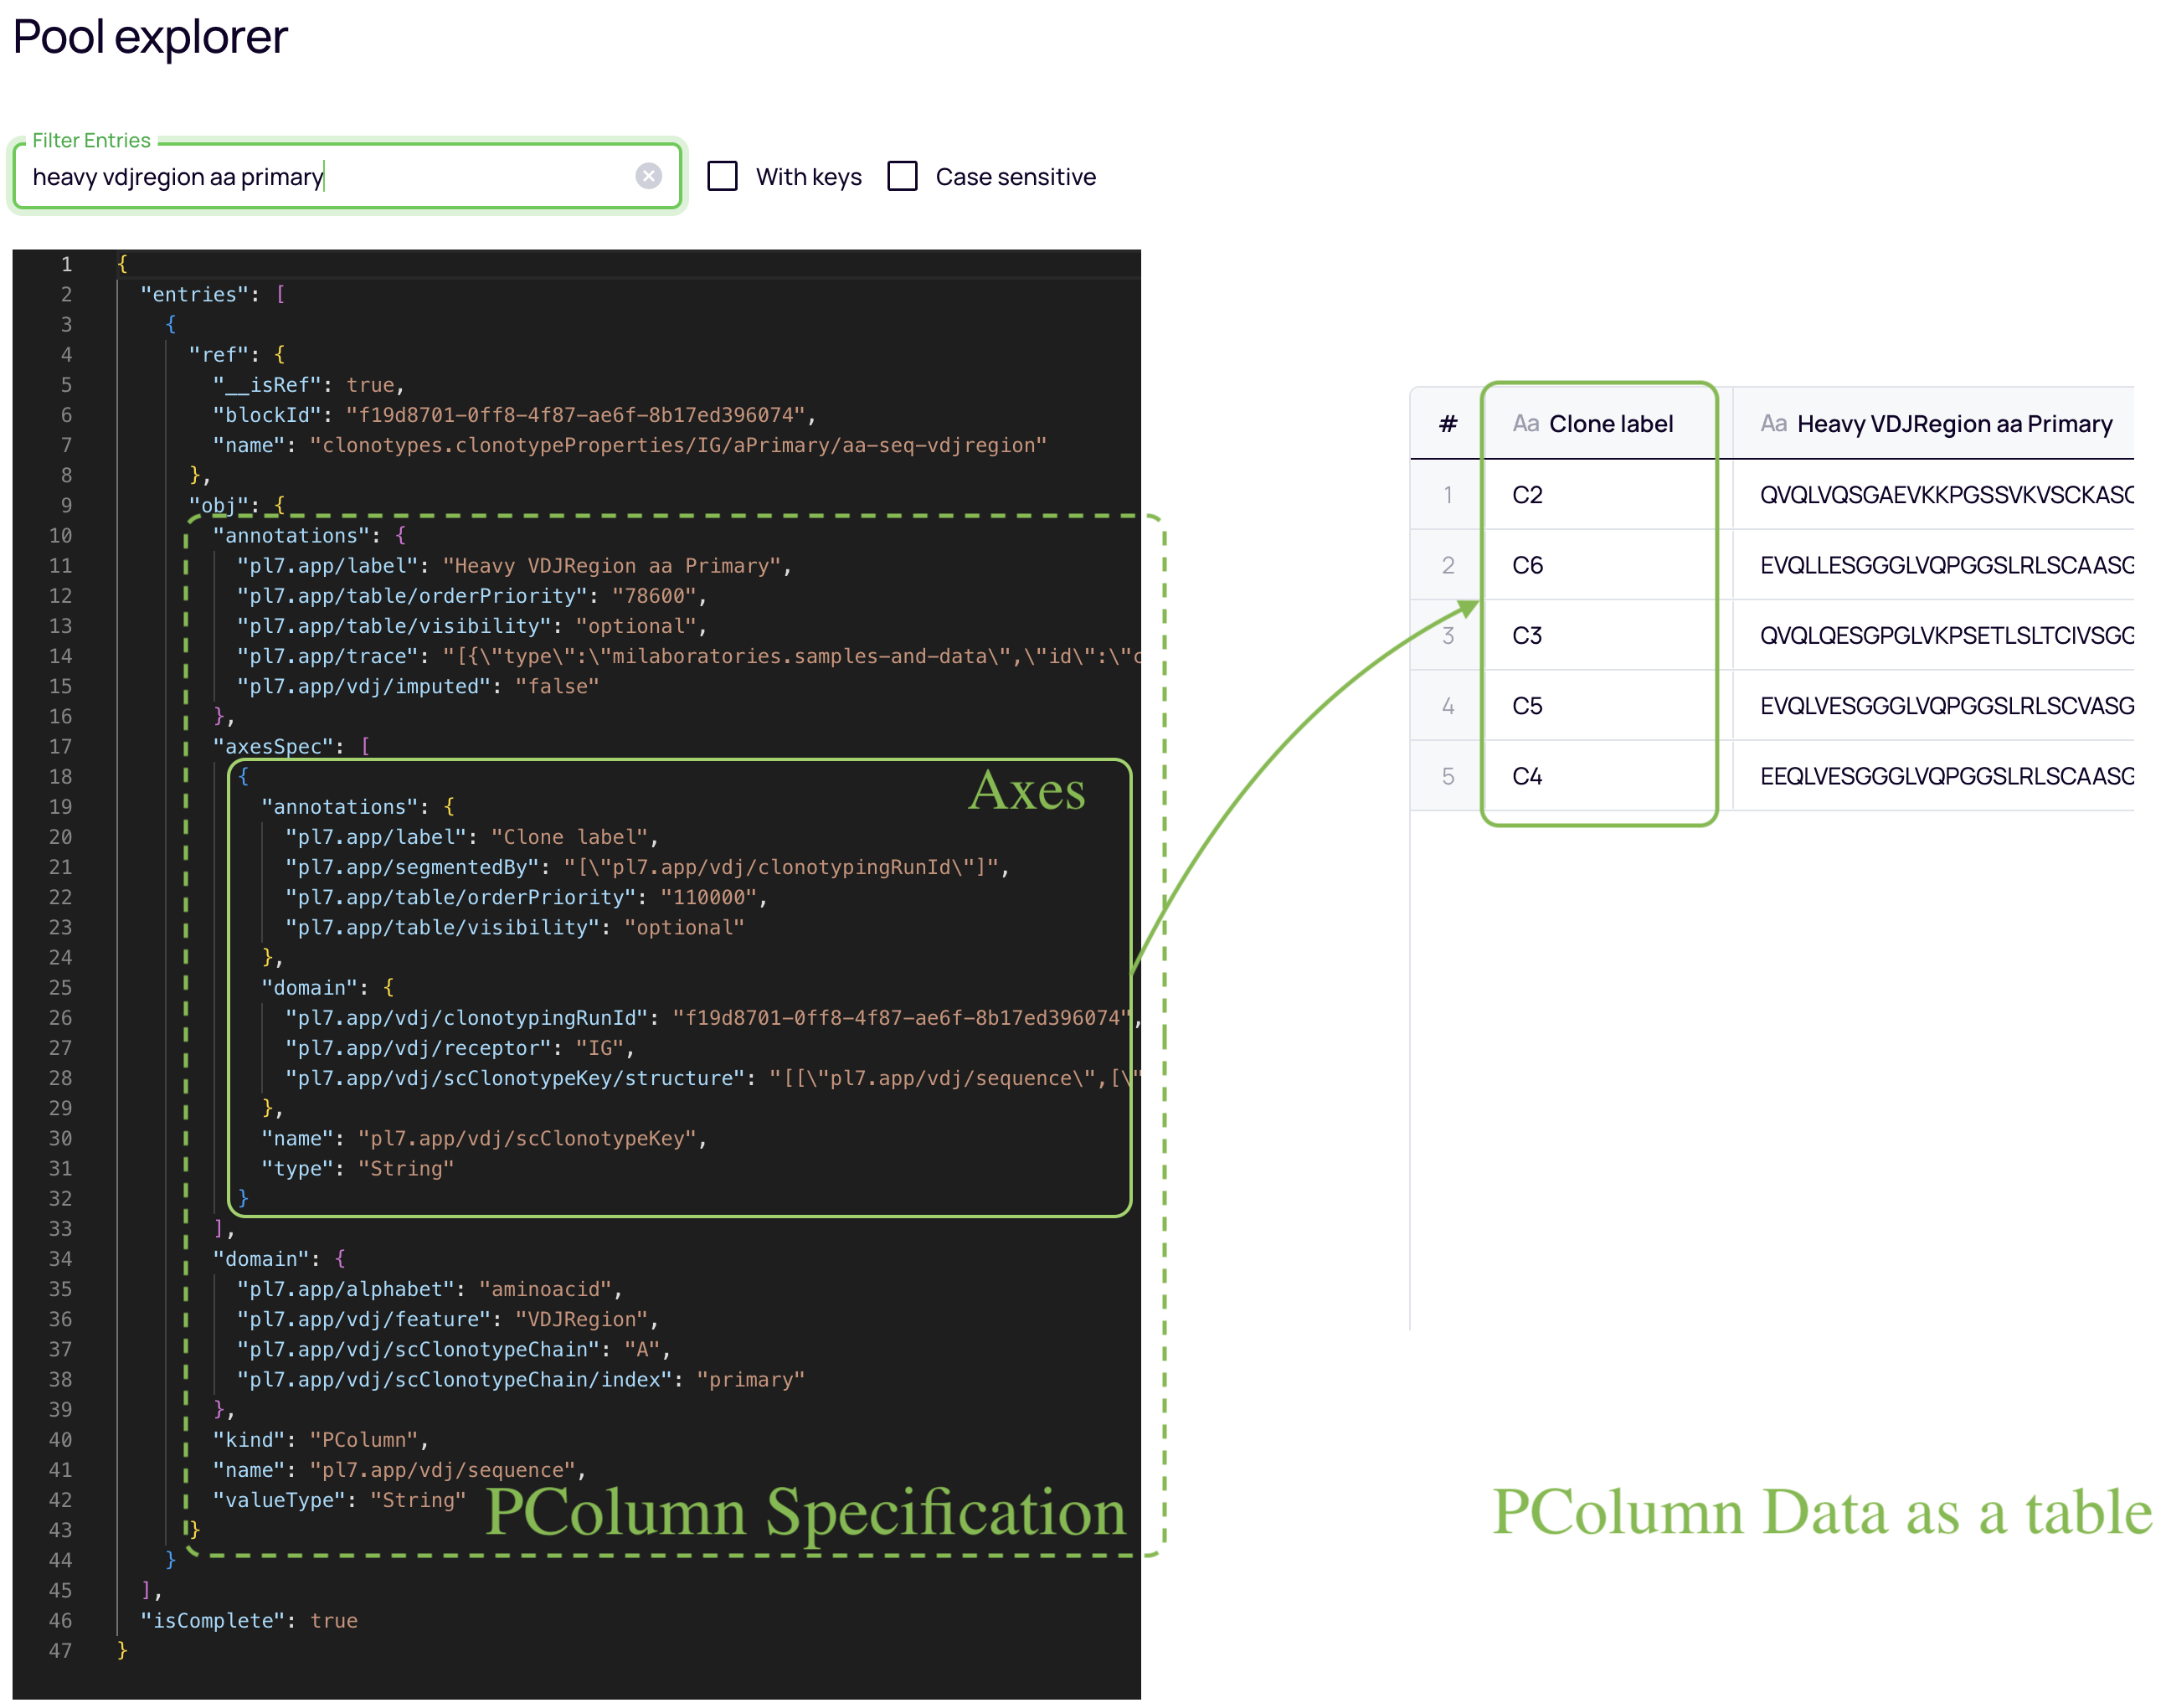
"PColumns" is the data structure used to store data in the Results pool. Put simply it can be seen as a table where:
- One column represents the data. For example the Heavy Chain VDJ Region.
- One or more columns represent where this data is coming from, uniquely identifying each row like a primary key.
For example the Clone Label.
- We call these columns "Axes" and we use them to correlate data and join them. For example, we will join the Heavy Chain PColumn with the Light chain PColumn and the Light chain type PColumn, since they share an axis: the "Clone Label".
- The specification: a structured way of describing the PColumn; its metadata. It contains information like:
- Which are the axes:
axesSpec - What the domain is:
domain:- Alphabet: aminoacid or nucleotide (identified by
domain["pl7.app/alphabet"]) - Clonotype Chain: Heavy / Light (identified by
domain["pl7.app/vdj/scClonotypeChain"])
- Alphabet: aminoacid or nucleotide (identified by
- Annotations:
annotations. They provide more information about the data. The UI components use the annotations when rendering. Some examples are:- Column names, dropdown labels, etc (e.g.
annotations: {"pl7.app/label": "Heavy VDJRegion aa Primary"}) - Show / hide column implicit behavior (e.g.
annotations: {"pl7.app/table/visibility": "optional"})
- Column names, dropdown labels, etc (e.g.
- Which are the axes:
Why do we need annotations when the specification is already metadata describing the PColumn?
Because PColumns are uniquely identified in the Resource Pool by their name, axes AND domain. When using PColumns we select them from the results pool based on their name, axis and/or domain, depending on how specific we want to be, BUT NOT by their annotation, as they are used for presentation purposes only.
UI: selecting a data source
The starting point of block development is usually selecting some datasource that the user can choose from to do the analysis, along with other relevant parameters for the analysis tool.
In the ImmunoMatch case, we want to present the user with datasources containing Heavy Chain sequences. To do this we need to... you guessed it, find compatible data in the result pool.
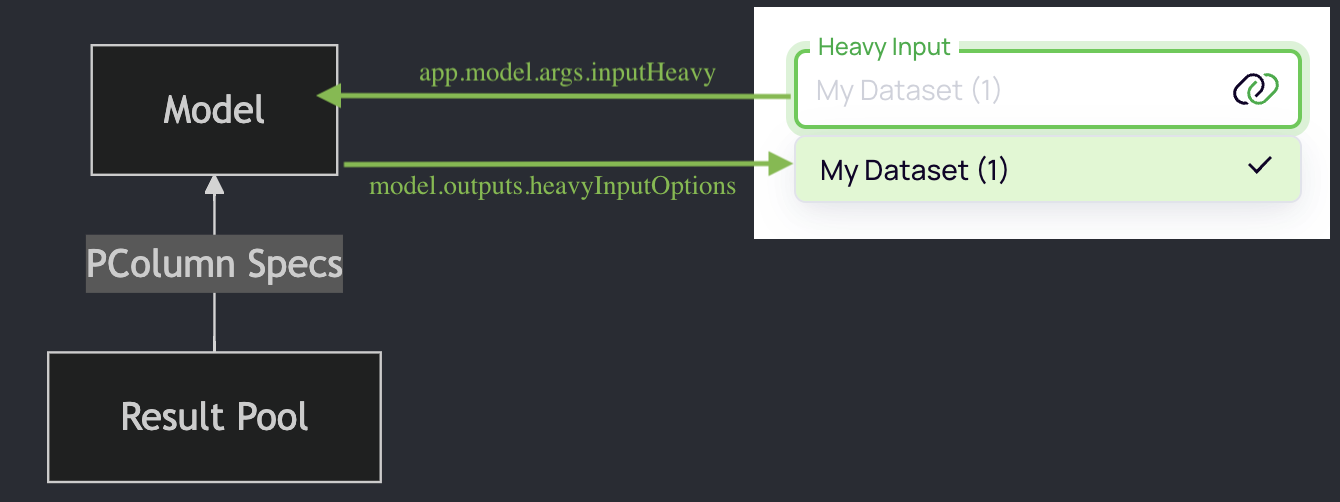
Model outputs
We use the model package to select the corresponding data from the result pool.
export const model = BlockModel.create()
  // ... additional code omitted

  // This is used to populate the "Heavy Chain" dropdown in the UI.
  .output('heavyInputOptions', (ctx) => {
    // Fetch PColumns from the result pool by spec properties.
    // Organize them as labeled references to be presented in UI dropdowns.
    return ctx.resultPool.getOptions(
      (spec) =>
        isPColumnSpec(spec)
        && spec.name === 'pl7.app/vdj/sequence'
        && spec.domain?.['pl7.app/alphabet'] === 'aminoacid'
        && spec.domain?.['pl7.app/vdj/feature'] === 'VDJRegion'
        && spec.axesSpec?.[0]?.domain?.['pl7.app/vdj/receptor'] === 'IG'
        && spec.domain?.['pl7.app/vdj/scClonotypeChain'] === 'A'
        && spec.domain?.['pl7.app/vdj/scClonotypeChain/index'] === 'primary',
    );
  })

  // ... additional code omitted
  .done();
Model outputs are the bridge between your block's data processing and its user interface. Each output has two key components:
-
Identifier String (first parameter):
- This becomes a property in the UI layer (Vue.js component)
- The identifier (
'heavyInputOptions'in our example) will be bound using:optionsto a Platforma UI dropdown form input that already knows how to render such data. - When users interact with a dropdown, this data binding keeps everything in sync.
-
Provider Function (second parameter):
- A callback function that receives the context object (
ctx) - Responsible for generating the data that will be exposed to the UI
- Typically returns data structures that UI components know how to render
- A callback function that receives the context object (
What's Happening Here?
-
Search the Result Pool:
ctx.resultPool.getOptions()searches through all PColumns available from upstream blocks. -
Filtering with a Predicate: The function takes a predicate (a function that returns true/false) to filter the PColumns:
isPColumnSpec(spec): Ensures we're looking at PColumn specificationsspec.name === 'pl7.app/vdj/sequence': Find only sequence dataspec.domain?.['pl7.app/alphabet'] === 'aminoacid': Looking specifically for amino acid sequences (not nucleotide)spec.domain?.['pl7.app/vdj/feature'] === 'VDJRegion': From the VDJ regionspec.axesSpec?.[0]?.domain?.['pl7.app/vdj/receptor'] === 'IG': Only immunoglobulin receptors (not T-cell)spec.domain?.['pl7.app/vdj/scClonotypeChain'] === 'A': Only "A" chains (Heavy chains)spec.domain?.['pl7.app/vdj/scClonotypeChain/index'] === 'primary': Only primary sequences
-
Returns Data Format: The function returns an array of
Optionobjects, each with:label: A user-friendly display name (derived automatically from the PColumn metadata)ref: A reference to the actual data that can be used later to fetch the content
Dropdown options in UI
Original code: ui/src/pages/Main.vue
const app = useApp();

// ... additional code omitted

<template>
    <!-- ... additional code omitted -->
    <PlDropdownRef
        v-model="app.model.args.inputHeavy"
        :options="app.model.outputs.heavyInputOptions"
        label="Heavy Input" />
</template>
The Platforma SDK creates the app.model object which contains:
model.outputs: Contains all the outputs defined in your modelmodel.args: Stores the user's selections and parameter values
In this example:
heavyInputOptionsis available asapp.model.outputs.heavyInputOptionsbecause it was defined in the model using.output('heavyInputOptions', ...)- When the user selects an option, the selected value is stored in
app.model.args.inputHeavy
The PlDropdownRef component is a specialized Platforma UI component
that renders option references returned by the model.
It automatically handles displaying the labels and managing the references behind the scenes.
Demo block with available Platforma UI components is found here: UI Examples
Running the analysis tool
The analysis tool will run in the backend based on the args passed from the UI.
All the code examples in this guide are taken from the ImmunoMatch block.
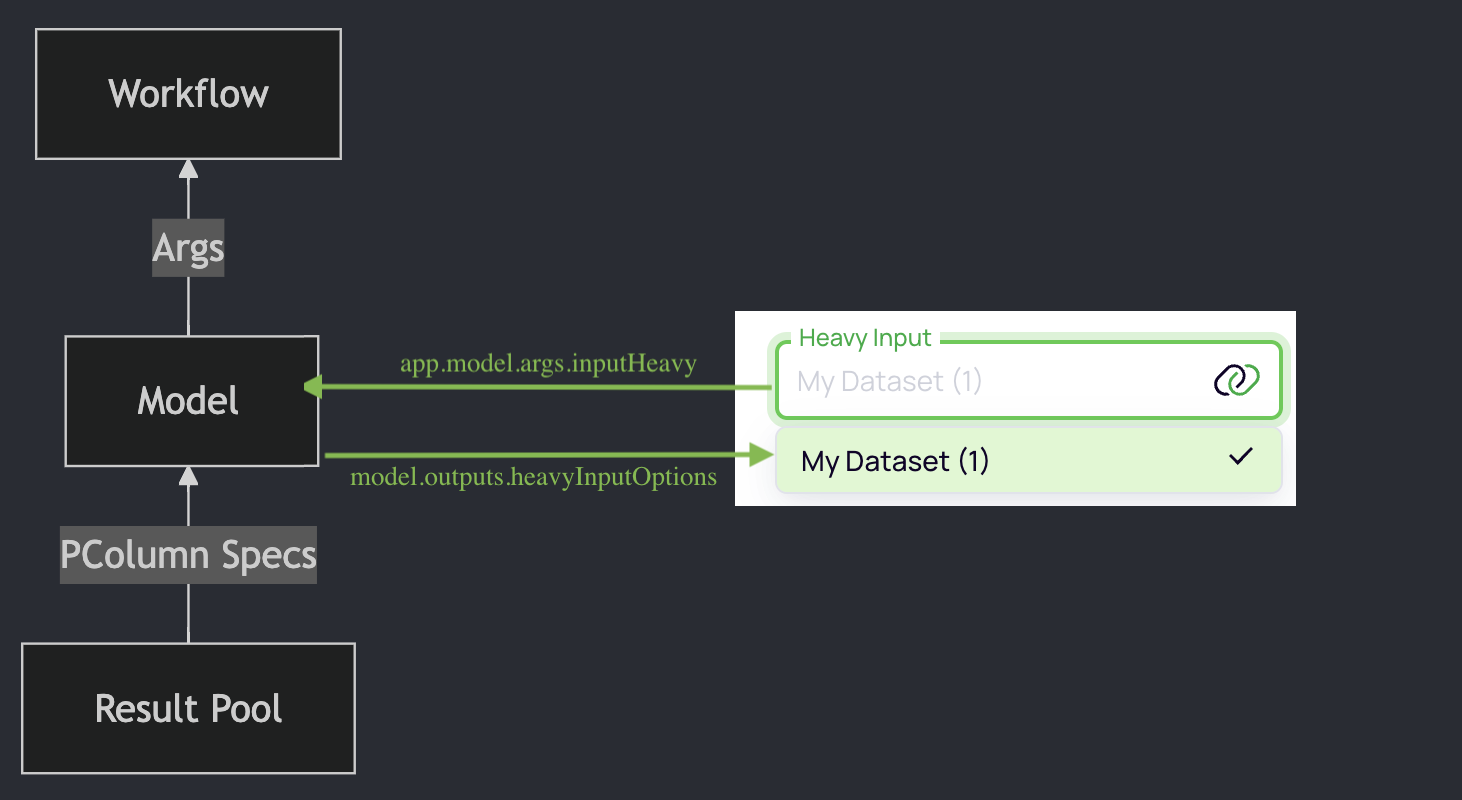
Args are declared in the model
Args are declared in the Model code, set by the user in the UI, and passed to the workflow code.
export type BlockArgs = {
  // Heavy chain PColumn reference from a MiXCR Clonotyping 2 block
  // It will be used to get the associated heavy chain sequences, light chain sequences,
  // and light chain type
  inputHeavy?: PlRef;
};

export const model = BlockModel.create()
  .withArgs<BlockArgs>({})
  // Activate "Run" button only after these conditions get fulfilled
  .argsValid((ctx) => ctx.args.inputHeavy !== undefined)
  // ... additional code omitted
  .done();
Bundle related PColumns
The workflow code will use the args to run the software analysis tool and send the results back to the model and/or result pool.
Resolving input resources
inputHeavy is a reference to the Heavy Chain PColumn. References need to be resolved before using them,
as they might not be available yet. They are similar to promises in JavaScript or futures in other languages.
wf := import("@platforma-sdk/workflow-tengo:workflow")
// ... additional code omitted

// Pre-resolve the heavyPCol resource before executing the workflow body
// This ensures the required input is available and ready when the body function runs
wf.prepare(func(args){
	return{
		heavyPCol: wf.resolve(args.inputHeavy, { errIfMissing: true })
	}
})
The prepare is a lifecycle function that is called by the Platforma SDK before the workflow body is executed.
Anchored Columns
The "Anchor" pattern can be viewed similar to a variable in a programming language.
In the example below, we're using the string "main" as an alias for our input Heavy Chain PColumn, but we could use any other string.
Then we can use it to search for other PColumns by referencing the "main" PColumn properties. For example:
domainAnchor: "main"- looking for PColumns with the same domain as the"main"PColumn.axes: [{anchor: "main", idx: 0}]- looking for PColumns with the same first axis as the"main"PColumn.
We can say that the resulting Columns Bundle is "anchored" to the "main" PColumn.
- Create a Column Bundler and anchor it to the Heavy Chain PColumn
// Column bundler helps gather related PColumns together.
// We're using anchoring here to link related data PColumns to the Heavy Chain input PColumn.
bundleBuilder := wf.createPBundleBuilder();
// By using "main" as an alias for our input Heavy Chain PColumn, we can reference its properties
// (like axes and domain values) when querying for related columns, ensuring they stay properly linked.
bundleBuilder.addAnchor("main", args.inputHeavy);
- Add Primary Light Chain Sequence PColumn
bundleBuilder.addById({
    name: "pl7.app/vdj/sequence",
    // Primary Light Chain PColumn has the same domain as the "main" anchor column (the Heavy Chain PColumn
    domainAnchor: "main",
    // ... except for the chain type ('A' being Heavy Chain, 'B' being Light Chain)
    domain: {
        "pl7.app/vdj/scClonotypeChain": "B"
    },
    // ... and has one axis, the same as the first and only axis of the "main" anchor column (the Heavy Chain PColumn)
    axes: [{anchor: "main", idx: 0}]
});
- Add Primary Light Chain Type PColumn
// Add Primary Light Chain Chain Type PColumn to identify Kappa or Lambda chains
bundleBuilder.addById({
    name: "pl7.app/vdj/chain",
    domain: {
        "pl7.app/vdj/scClonotypeChain": "B",
        "pl7.app/vdj/scClonotypeChain/index": "primary"
    },
    // Has one axis, the same as the first and only axis of the "main" anchor column (the Heavy Chain PColumn)
    // The anchor axis domain includes the clonotypingRunId, which is sufficient to uniquely identify the associated
    // Light chain type (e.g. "pl7.app/vdj/clonotypingRunId": "e0551d7e-e33b-449c-93f9-ae9b85a02616")
    axes: [{anchor: "main", idx: 0}]
})
Full schema for anchored columns queries is available here: Workflow - schema for anchored columns queries
Preparing the csv data for the analysis tool
Resolving the Column Bundle Resource
At this point we have a "Resource" with all the PColumns we need to gather the data and prepare it for the analysis tool. However, Resources are like promises in JavaScript, or futures in other languages. They need to be resolved before using them.
The way to achieve this, and you will see this pattern in many places in the Platforma SDK, is to render another template , that is a nother *tpl.tengo file, that will use this Resource as input.
The new template will have access to the resolved Resource, and we can use it to prepare the csv data for the analysis tool.
render := import("@platforma-sdk/workflow-tengo:render")

// imm.tpl.tengo is the template that will process the column bundler results.
imm := assets.importTemplate(":imm")

// Process the column bundler results in a separate template.
// Inside the "imm" template we will have access to the resolved PColumns from the columnBundle.
// createEphemeral is needed here to ensure the template is executed every time (not deduplicated)
immResult := render.createEphemeral(imm, {
    blockId: blockId,
    anchorCol: args.inputHeavy,
    scKeyAxisSpec: scKeyAxisSpec,
    columnBundle: columnBundle
})
Exporting column bundle to a csv file
Within the imm.tpl.tengo template, we can use the columnBundle resource to export the data to a csv file.
This is achieved by:
- Creating a table builder from the column bundle. The table builder has access to the resolved PColumns from the columnBundle, but need to select which ones to include
- Select the PColumns from the bundle that we want to include in the csv.
- Build the csv table.
// Preparing a CSV table from the column bundle to pass to the ImmunoMatch software (python script)
tableBuilder := columnBundle.xsvTableBuilder()

// TableBuilder has access to the resolved PColumns from the columnBundle, but need to select which ones to include
// The ImmunoMatch software needs to know the column header names. {header: "chosen-header-name"}
// overrides the default header name in the resulting CSV.
tableBuilder.add(anchorCol, {header: "VH"})
tableBuilder.add({/* Code removed for brevity. See orig file */}, {header: "VL"})
tableBuilder.add({/* Code removed for brevity. See orig file */}, {header: "locus"})

tableBuilder.setAxisHeader({name: "pl7.app/vdj/scClonotypeKey"}, "scClonotypeKey")

// Build the CSV table from the selected PColumns
fullTable := tableBuilder.build("csv", {joinType: "Inner"})
Run the analysis tool with the csv data
Import the ImmunoMatch models for Kappa and Lambda chains. They are stored separately from the block
assets:= import("@platforma-sdk/workflow-tengo:assets")

immunomatchKappa := assets.importAsset("@platforma-open/milaboratories.immunomatch-assets:immunomatch-kappa")
immunomatchLambda := assets.importAsset("@platforma-open/milaboratories.immunomatch-assets:immunomatch-lambda")
The ImmunoMatch models are stored separately from the block to avoid bloating the block bundle with large assets. Creating assets and publishing them to the Platforma Registry will be covered in a later guide.
In the development phase, the models can be imported from the local file system to avoid the need to publish them first.
Run the ImmunoMatch software
The ImmunoMatch software is a python script that can be run using the exec package.
immunoMatch := exec.builder().
    software(assets.importSoftware("@platforma-open/milaboratories.immuno-match.software:immuno-match")).
    // Create directories for the models
    mkDir("immunomatch-lambda").
    mkDir("immunomatch-kappa").
    // Add the models to the appropriate directories in the working directory
    addAsset(immunomatchKappa, "immunomatch-kappa", []).
    addAsset(immunomatchLambda, "immunomatch-lambda", []).
    // Add the tableBuilder created CSV table to the working directory
    addFile("input.csv", fullTable).
    // Pass the model directories and input CSV to the ImmunoMatch software as arguments
    arg("--kappa_dir").arg("immunomatch-kappa").
    arg("--lambda_dir").arg("immunomatch-lambda").
    arg("--input").arg("input.csv").
    // Output the predictions to a CSV file
    arg("--output").arg("predictions.csv").
    // Pass the column names for the VH, VL, and locus columns
    arg("--hseq_col").arg("VH").
    arg("--lseq_col").arg("VL").
    arg("--ltype_col").arg("locus").
    // Save the ImmunoMatch output CSV file to prevent it from being deleted after the template execution
    saveFile("predictions.csv").
    run()
Export the ImmunoMatch results
Once the ImmunoMatch software has finished running, we can getFile any files it produced and were marked
to be persisted (saveFile) after the template execution finishes.
predictionsCsv := immunoMatch.getFile("predictions.csv")
We can only export PColumns to the result pool, not files. So we need to parse the CSV file into a PColumn.
The actual thing we are exporting is a PFrame, which is like a table with a set of PColumns.
As we saw earlier, PColumns have a spec property that describes them, which contains axes
information, and axes are just other columns of unique identifiers for the PColumn data values that can be used to
join PColumns with the same axes.
In the below code you can see that:
- We use the SDK
xsvpackage to parse the CSV file into a PFrame. axes: specify the axes for the PFrame, which are the same as the ones used in the ImmunoMatch software.columns: specify which CSV columns to include in the PFrame. In this case we are including just one column.column: the header name of the CSV column to include.spec: the spec for the PColumn, which describes the PColumn's data type, name, and domain.
xsv := import("@platforma-sdk/workflow-tengo:pframes.xsv")
// Parse the output CSV as a PFrame with one PColumn for the pairing scores
predictionsPFrame := xsv.importFile(predictionsCsv, "csv",
    {
        axes: [{
            // CSV column that will be used as axis. Identified by the CSV header name
            column: "scClonotypeKey",
            // Define the axis spec that will be used in the created PColumn.
            // In this case we are using the axis spec as the heavy chain PColumn.
            spec: scKeyAxisSpec
        }],
        columns: [{
            // CSV column that will be used to create the PColumn. Identified by the CSV header name
            column: "pairing_scores",
            // Define the spec for the PColumn.
            spec: {
                valueType: "Double",
                name: "pl7.app/immunomatch/pairing_score",
                annotations: {
                    "pl7.app/label": "Pairing Score",
                    "pl7.app/vdj/receptor": "IG"
                },
                domain: {
                    "pl7.app/blockId": blockId,
                    "pl7.app/alphabet": "aminoacid",
                    "pl7.app/vdj/feature": "VDJRegion",
                    "pl7.app/vdj/scClonotypeChain/index": "primary"
                }
            }
        }]
    }
);

// Return the PFrame to the main template (main.tpl.tengo)
return {
    predictionsPf: predictionsPFrame
}
Make the PFrame available to the UI and to the Result Pool for downstream blocks
predictionsPf := immResult.output("predictionsPf")

return {
    outputs: {
        // UI will use outputs to display the predictions as a histogram.
        // Since the block workflow is executed on the back-end, we need to export the data to the client side.
        // `exportFrame` is needed to make the data available on the client side (model & UI)
        predictions: pframes.exportFrame(predictionsPf)
    },
    exports: {
        // Export the predictions to the results pool to make them available for downstream blocks
        predictionsPf: predictionsPf
    }
}
Show the results in the UI
Workflow outputs are also visible in the block model.
The model will prepare the data to be displayed in the UI in one of the Platforma SDK UI toolkit
components: the GraphMaker component, configured to display the predictions PFrame as a histogram.
All components in the toolkit are tailored to work with PFrames, know how to pull the data from the backend and properly display it in the UI.

Model: Prepare the PFrame for the GraphMaker component
// Get the IMM predictions and prepare them for the histogram graph
  .output('predictions', (ctx) => {
    const pCols = ctx.outputs?.resolve('predictions')?.getPColumns();
    if (pCols === undefined) return undefined;

    return createPFrameForGraphs(ctx, pCols);
  })
Model: Set GraphMaker initial configuration
The configuration is stored in the persistent UI state.
All properties set in .withUiState will be persisted even if the view is switched to another block,
or the Platforma Desktop Application is restarted.
// Persisted UI state and initial graph configuration
export type UiState = {
  graphStateHistogram: GraphMakerState;
};

export const model = BlockModel.create()
// ... additional code omitted
.withUiState<UiState>({
    graphStateHistogram: {
      title: 'ImmunoMatch',
      template: 'bins',
      currentTab: null,
    },
  })
UI: add the GraphMaker component to the block
Now that the GraphMaker data source PFrame and the initial configuration were created in the model, we can add the GraphMaker component to the block.
v-modelbinds the UI state to the GraphMaker component.:p-framebinds the GraphMaker data source PFrame to the GraphMaker component.:default-optionsconfigures which PColumn from the PFrame will be used as the data source for the graph.
Original source code: MainPage.vue
<!-- code removed for brevity -->
<GraphMaker
    v-model="app.model.ui.graphStateHistogram"
    chartType="histogram"
    :p-frame="app.model.outputs.predictions"
    :default-options="[{
      inputName: 'value',
      selectedSource: {
        kind: 'PColumn',
        name: 'pl7.app/immunomatch/pairing_score',
        valueType: 'Double',
        axesSpec: [
          {
            name: 'pl7.app/vdj/scClonotypeKey',
            type: 'String',
          },
        ],
      },
    }] satisfies PredefinedGraphOption<'histogram'>[]"
  />
Development environment
Install the Prerequisites
Run Local back-end
Follow the instructions in Run Local Backend
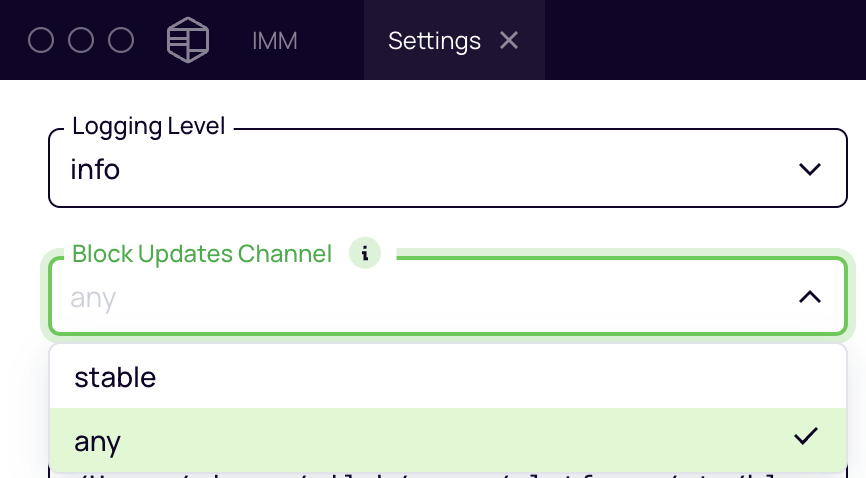
Configure non-stable blocks repository channel
Open the Platforma Desktop Application and click "Settings".
In the "Block Updates Channel" dropdown, select "any".
Configure development blocks registry
Follow the instructions in Set Path to Development Blocks